Wednesday, October 13, 2021

Sunny Studio Stamps Fall Scene Card

 Hello friends! Today I'm sharing a card featuring images from multiple Sunny Studio Stamp Sets.


I started by using my Copic Markers to color the tree, sunflowers and mushroom images from "Happy Harvest". The log and pumpkins are from "Fall Friends" and the cute little bunny is from "Beach Buddies". I die cut all the images using the coordinating dies.

I created my background by ink blending with Distress Oxide Ink in the colors Salvaged Patina and Shabby Shutters.  I then used the border from the "Frilly Frames Eyelet Lace" Die Set to give my background that delicate scallop edge. I adhered this panel to some pattern paper from the "Sweater Weather" 6x6 paper pad and I love those cute little polka dots peeking out around the edge of the card.

Before adhering my colored images I die cut three fences from the "Scalloped Fence" Die set and arranged them across the middle of my card. I did some trimming and modifying as needed.

I used a combination of liquid glue and thin foam squares to attach the images to my fun Fall scene. I die cut an additional tree and stacked up the image to provide a little bit of extra sturdiness to that larger image. I really love that tree image!

I finished my card by stamping a sentiment from "Fall Friends" onto the bottom of my panel with a black pigment ink and adhered the panel to an A2 size cardbase.

I hope you enjoyed today's Fall scene card!

Thank you!

Jen

Thursday, September 9, 2021

AECP - Simple Boutique Cards

 Hello again crafty friends!

Time for a few more Altenew Educator Certification Program (AECP) cards!!  I recently finished up a class called "Simple Boutique Cards" and would love to share with you the projects I made using what I learned.  I loved that this class encouraged me to focus on making beautiful cards that did not have a lot of layers to them.

Stamped Background:


My first card is probably my favorite of the two.  One of my favorite crafty things is creating easy watercolor backgrounds.  So I started this class by taking out my Altenew 36 pan watercolor set and some watercolor paper.  I used a wet on wet technique and created an easy pink panel with some pops of orange.  I also added some gold splatters.

After I trimmed my panel to A2 size I placed it in my MISTI and stamped my sentiment in the center.  I used Altenew Obsidian Black ink to the stamp the sentiment and all the other images on my panel. I alternated between stamping the Wonder Bloom and Wonder Flower stamp. Once I was happy with my flower image placement, I filled in the open spaces with a flourish image from the Hennah Elements Stamp Set.

I finished the card by placing the panel onto a A2 cardbase.  I really love the colors and flowers on this card.  I have to say that creating one layer cards is definitely stepping outside my comfort zone but I'm happy with the result!

Designer Paper:


For my next card I knew I wanted to do some heat embossing on vellum.  I just the love the way an outline stamp looks on vellum heat embossed in gold!  This was also my first time trying out coloring with my Altenew alcohol markers on vellum. 

After stamping out the Altenew Paint-A-Flower Sunflower I turned over my heat embossed image and colored it on the BACKSIDE of the vellum.  This was so the alcohol ink would not smear and so that the embossing powder would not damage my marker tips!

My next step was to create a simple background for my flowers.  I stamped the Whimsical Herringbone Stamp onto a piece of white cardstock in the color Fuschia. The background adds a subtle interest behind the vellum.

When I cut my vellum (A2 size) I added an additional 1/4 inch to the length so that I could score and fold the top to wrap around my panel of cardstock.  This allowed me to adhere my vellum without having to worry about hiding adhesive!

 My last step was my sentiment! I stamped "You are my Sunshine" from the Sunflower set in black ink onto white cardstock.  I trimmed the sentiment down and added a thin black matte to the back.

That finishes my cards for today! I hope you enjoyed them and maybe picked up some inspiration to try out your own Simple Boutique Cards!

Thanks again for stopping by! See you again soon.

Jen


Friday, September 3, 2021

Sunny Studio Stamps - Fabulous Flamingos!

Welcome and thank you for stopping by!

Today's card features some cute little flamingo friends courtesy of Sunny Studio Stamps.  Let's get into the card!


I have been loving coloring with my Zig Clean Color Real Brush Markers lately. I find that I get the best results using Strathmore Bristol Smooth paper for this technique.

I started out by stamping two of the flamingos, all of the leaves and bunch of the little flower image.  I used a black pigment ink and gave it a few minutes to dry before starting my coloring.  


After coloring my images using pinks, greens and also the blender marker I cut all of the images out using the coordinating dies.  Isn't it nice when you have the coordinating dies!  When I first started crafting I convinced myself that I didn't need them (silly girl!) but now I'm feeling spoiled LOL!!

The background was very fun to make and pretty easy too!  I started by ink blending on some smooth white cardstock using Distress Oxide Inks.  I used Milled Lavender, Shaded Lilac and Wilted Violet.  I trimmed my panel to 4 x 5 1/4 and then ran the panel through my die cutting machine using this lovely floral lace embossing folder. Yes, I placed the wrong side down in the folder (oops!) but I still like how it looks! The image is now de-bossed or pressed in rather than popping up!  Hope that makes sense!


I arranged my images in the center of my panel and adhered them using liquid glue.  I used a sentiment from the stamp set and stamped it onto a banner that I created using a die from my stash onto some white cardstock.

I adhered my finished panel onto a white cardstock and added some glossy accents to the flowers and flamingo's beaks for a little added dimension.


I just love this card and stamp set.  I just screams Summer to me and that's OK even though Fall is moving in on us fast!

Hope you enjoyed my card and I'll see you again soon!

Jen

Tuesday, July 27, 2021

AECP - Let It Shine!

 Hello Crafty Friends!

Today I'm back sharing another Altenew Educators Certification Program class.  The latest class I worked my way through was "Let It Shine" which is taught by the lovely Carissa Wiley.  If you love adding shiny and sparkly accents to your handmade cards then you will LOVE this class.

Hello Cosmos!

My first card features the Altenew Craft-A-Flower Cosmos Layering Die Set.  When I saw this set I knew I needed it in my life!  You can create lovely dimensional flowers with these dies.  The options are endless on how you can color, add texture and add shine.


I started by choosing some Altnew ink pads (Baby Pink, Blush, Sunray, Snapdragon) and ink blending them onto smooth white cardstock.  Next I die cut all the flower pieces from my ink blended cardstock.  To add my "shine" component I chose to heat emboss one of the flower layers with Altenew Golden Peach Crisp Embossing powder.  I also heat embossed the leaves with a green glitter embossing powder from my stash.  I assembled the flower layers with liquid glue.

My background was SUPER simple.  I die cut the Altenew Watercolor Stripes Cover Die from white cardstock and backed it with a piece of black glitter cardstock before adhering both to an A2 cardbase.

I chose the Altenew Fancy Hello Die as my sentiment.  I created a gold dipped effect by ink blending the top of the die cut with Sunray and Snapdragon Ink and heat embossing the bottom with gold embossing powder.

Shiny Hennah Flowers

My second card started out by heat embossing (with gold) images from the Altenew Hennah Elements Stamp Set.  I colored the images with watercolor markers and a blender marker.  I used the coordinating dies to cut out my finished images.


To create my background I dry embossed a 4 x 5 1/4 piece of smooth white cardstock with the Altenew Bubble Wrap Stencil to give a little texture and interest. I then adhered a piece of decorative washi tape from my stash to the left side of the panel.  I adhered the panel to an A2 cardbase with adhesive runner.

After arranging my floral images, I adhered them with a combination of liquid glue and foam squares.

The finishing "shiny" touch was to add the gold mirror "Hugs" (Simple Greetings Die Set) sentiment!

As you can see these cards were not very hard to create but they look amazing because of the gorgeous shiny accents.  Try adding some shine to your next card and I bet it will take it to the next level!

Thanks for stopping by!

Jen


Thursday, June 10, 2021

AECP - Celebration Stencil Techniques

Hello friends!

I hope you are well! Today it's time to share some more Altenew Educator Certification Program (AECP) cards.  I recently finished a class called Celebration Stencil Techniques.  Stencils are so fun, inexpensive and versatile.  Altenew has some really beautiful stencils too!

Watercoloring with Stencils:


My first card features a soft watercolor effect.  I created the effect with my ink pads and the Altenew Narrow Brick Stencil.  Once my panel was dry I took the same ink colors (Sunray, Baby Pink, Lavender Fields) and softly ink blended over and around the edges of my panel.

My focal point is the lovely Paint-A-Flower Daffodil which I colored with my Altenew Alcohol Markers.  I love their markers because they coordinate with the Altenew Inks and come in color families.  This makes it so easy to pick colors that will work well together and blend easily.  I used the colors Bamboo, Parrot, Olive, Citrus Burst, Sunkissed and Autumn Blaze.  I fussycut the image out when I was done coloring it.

I love the pink dainty frame that I adhered to the stenciled panel.  It really adds a delicate touch.  I created it by ink blending on smooth white cardstock and die cutting the frame.

I chose the sentiment "Thank You" from the Heartfelt Sentiments Stamp Set and stamped it with Obsidian Black Pigment Ink directly onto my panel.

I assembled my card by adhering every with liquid glue.  The finishing touch was some yellow rhinestones from my stash.

Glitter Paste with Stencils:


My second card features beautiful glitter paste! This was my first time using a glitter paste and I have to say I was completely impressed! It creates a stunning effect.

I started out by ink blending the Flowing Drops Stencil onto some smooth white cardstock.  I used the colors Baby Pink, Sunray and Lavender Fields.  Keeping the stencil in place I applied the glitter paste.  Once the panel was completely dry I die cut it using two rectangle dies from my stash.  The inner rectangle was popped up with some craft foam.

I used the Altenew Embroidered Blooms Stamp Set to create the flowers on my card.  I used the same ink colors that I used on my stenciled panel to stamp out the images.  I then fussy cut out the flowers and leaves.  I arranged the flowers how I liked them and took a picture with my phone.  This is a tip if you want to remember how to glue the images back down in the same arrangement.

Next I die cut a circle from the Altenew Circular Elements Die Set from some pink glitter paper.  I cut the circle in half and adhered the two pieces behind my stamped images.  The flowers were adhered with a combination of liquid glue and foam squares.

I love the white and gold sentiment on this card!! I die cut the "Hello" from the Altenew Simple Greetings Die Set using white & gold cardstock.  The last step was some glitter glue to the centers of the smaller flowers.

That's my two cards for today! This class was fun and I really enjoyed trying some new techniques that I hadn't tried before!

Thank you so much for stopping by!

Jen


Tuesday, May 25, 2021

AECP - Easy Ink Blending

 Hello!!

Today I'm sharing some cards that I made for the Altenew Easy Ink Blending Class.  This class is a great introduction into ink blending and gives great tips for improving your ink blending technique.

Ink Resist:

My first card includes an ink resist.  The stamped image is heat embossed and then ink blending was done over the image.  I used the Altenew Paint-A-Flower Sunflower Stamp Set and heat embossed it in white onto some smooth white cardstock.  Fuchsia Dye Ink was blended over the sunflower image before I die cut it using an oval die from my stash.  I also die cut the same oval from white cardstock two more times and glued the layers together to add dimension.


To create a background with a little extra interest I trimmed down a piece of black cardstock to 4 x 5/14 and heat embossed the branch image from the Mini Branch stamp set.  I used Altenew Crystal Clear Embossing powder to create a tone on tone effect. I adhered my sunflowers onto the panel and then adhered both onto a pink cardbase. 


My sentiment is the Fancy Hello Die and it was the finishing touch to my card.  I created an ombre effect by ink blending some fuchsia ink onto the white cardstock die cut and used a lighter hand as I blended upwards.  My sentiment was initially feeling lost on the floral image.  I die cut two small branches from the Branches and Berries Die Set and adhered them to the back of the "Hello".  The addition of the branches helped it stand out a bit more.


Faux Watercoloring:

I think this second card is my favorite one! I just love how it came out.

I actually started with the background panel on this one.  I used the Dotted Swirls Debossing Cover Die.  This die is really cool because it doesn't cut the cardstock but debosses the swirl design onto it.  I then ink blended Fuchsia Ink (are you sensing a theme with the fuchsia?? LoL) onto the panel focusing on the outer edges.  The dotted design kind of soaks up the ink and it creates a very cool effect.


Next I stamped two of the images from the Perfectly Perfect Stamp Set with a permanent black ink.  I softly ink blended the flower images using Fuchsia and Baby Pink Dye Ink and the leaves in Shadow Creek.  I then used the same colors as well as some Chamomile Ink to add some dimension to my florals by creating a watercolor effect.  I adhered my flowers with foam squares.


The sentiments were heat embossed in white onto black cardstock and die cut using the Featured Sentiments Die Set.  The sentiments are from the stamp set and were adhered with liquid glue.  To finish I adhered the panel to a black cardbase.


I really love how both cards came out but the second is my favorite for sure!

Thank you so much for coming by today.  Remember to check out the Easy Ink Blending Class on the Altenew Website if you need help with your ink blending.

Jen


Friday, May 21, 2021

Pinkfresh Studio - Folk Hummingbird

 Hello friends!

Bird images have been very popular lately in the cardmaking world!  So I decided to pick up the Pinkfresh Studio Folk Hummingbird Stamp Set and make my own bird card.


I started out by stamping the bird and large floral cluster in Versamark Ink and heat embossing them in gold embossing powder.  I used a smooth white cardstock.  I colored the images using my Zig Clean Color Real Brush Markers and then fussy cut everything out. 

I wanted to create a soft background for my card.  I began by ink blending Ballet Slippers and Soft Lilac onto smooth white cardstock.  I focused the ballet slippers on the top and bottom and the soft lilac toward the middle.  I die cut the panel with the Folk Dance Die and adhered it to a white cardbase.


For my sentiment I heat embossed the "Good Vibes" from the stamp set.  I used a gold embossing powder.  I die cut the sentiment with a scalloped circle die from my stash and backed it with a slightly larger circle cut from gold mirror cardstock.

To assemble my card I adhered my images with foam squares and then added my sentiment with liquid glue.  The finishing touch was some of my favorite jewels!


I hope you enjoyed my lovely bird card!

Thank you so much for taking the time to read my blog! 

Jen


Wednesday, May 19, 2021

AECP - Easy Die Cutting Techniques


 Hello Friends!

I hope your week is starting off nicely! Are you ready for another set of cards from my fun Altenew Educators Certification Program (AECP) journey?? 

I'm excited to share two cards today that were inspired by a fun Altenew Class called "Easy Die Cutting Techniques".  This class is taught by the lovely Yana Smakula!! She's so talented and it was really fun to learn from such a well known crafter in the industry!

Negative Die Cutting:

My first card is a clean and simple design! I started out by cutting some different shades of pink and yellow cardstock from stash into 1/4 inch strips.  I adhered the strips in a pattern onto some white copy paper  (cut to 4 1/2 x 5 1/2) in a diagonal fashion.  Once the panel was covered I trimmed off the over hanging strips and trimmed the whole panel down to 4 x 5 1/4.  The colorful eye candy of a panel was adhered to a pink cardbase.


Next, I trimmed a piece of pink cardstock down to 3 1/2 by 5 1/4.  I took one one of the solid flower dies from the Craft-a-Flower Cistus Set and die cut it twice from my pink panel.  This panel was adhered to the striped background with foam squares. 

I next ink blended sunray, snapdragon, pink pearl and coral bliss dye ink onto some white smooth cardstock.  I used this panel to die cut some of the small flower shapes from the Cistus Set (actually part of the larger cistus but kind of looked like a daisy to me) and also stamped my sentiment onto it.  I used the Featured Sentiments Die Set to cut out my sentiment before adhering it to my card with foam squares.  I finished up my card by adhering the small flowers and adhering a pink rhinestone to each center.

Using a Die Cut as a Stencil:

For my second card I started out by die cutting the Stacked Diamonds Cover Die from some thick white cardstock.  I used the die to softly ink blend a portion of the design onto some smooth white cardstock.  I used the color pale mauve.  I also used a stitched rectangle die to die cut the panel.  


Next, I stamped the Mini Delight - Bold Bloom Stamp Set in a black safe for alcohol markers ink.  I used my purple wine, rose quartz, puffy heart, mountain mist, and volcano lake markers to color the images.  I used the coordinating die to cut out the flower clusters and adhered them to my ink blended panel with liquid glue.

I wanted to pull in more of the Stacked Diamond Design so I die cut the cover panel again from silver mirror cardstock.  I cut a portion of the die cut and adhered it to a purple cardbase.  

I used some craft foam and double sided tape to pop up my ink blended panel onto my cardbase.  Lastly, I stamped a sentiment from the Sweet Flowers Stamp Set onto some purple cardstock with Obsidian Black Ink.  The sentiment was die cut from a small stitched rectangle die from my stash and adhered with foam squares.  For a little sparkle I added some crystal sequins.

I hope you enjoyed today's cards! Remember if any of these classes interest you they are open to anyone not just AECP Participants!  Go to the Altenew Website for more information.

Thanks again!

Jen


Friday, May 14, 2021

AECP - All About Layering 2

 Hello and thank you for stopping by today!

I recently finished up another class for the Altenew Educators Certification Program (AECP). The class is called All About Layering 2 and it teaches you even more tips and tricks about Altenew layering stamps.

Today I have 3 cards to share with you.  The first card features the Altenew Build-A-Flower: Coneflower Layering Stamp Set.


I am sucker for anything daisy so I was really drawn to this set.  I stamped out both flower images starting with the outline images using Milk Chocolate Ink.  The layers were stamped using the Shades of Purple Ink family (the first 3 shades), Almond Butter, Hazelnut, Grass Fields and Mountain Pine ink.  I used the coordinating dies to cut out the flowers.

My background panel was created by embossing the large flower die over a white cardstock sheet cut to 4 x 5 1/4 and ink blending it with Soft Lilac ink.  I stamped the sentiment "Your Kindness warms my heart" with Deep Iris ink onto white cardstock and back it with a piece of silver mirror cardstock.

I adhered my background with some strong double sided tape onto a white cardbase after wrapping the lowest portion with piece of ribbon from my stash.  I adhered my sentiment with the same tape and my flowers were adhered with liquid glue and foam squares.  The card was finished with some glitter glue on the cones of the flowers.

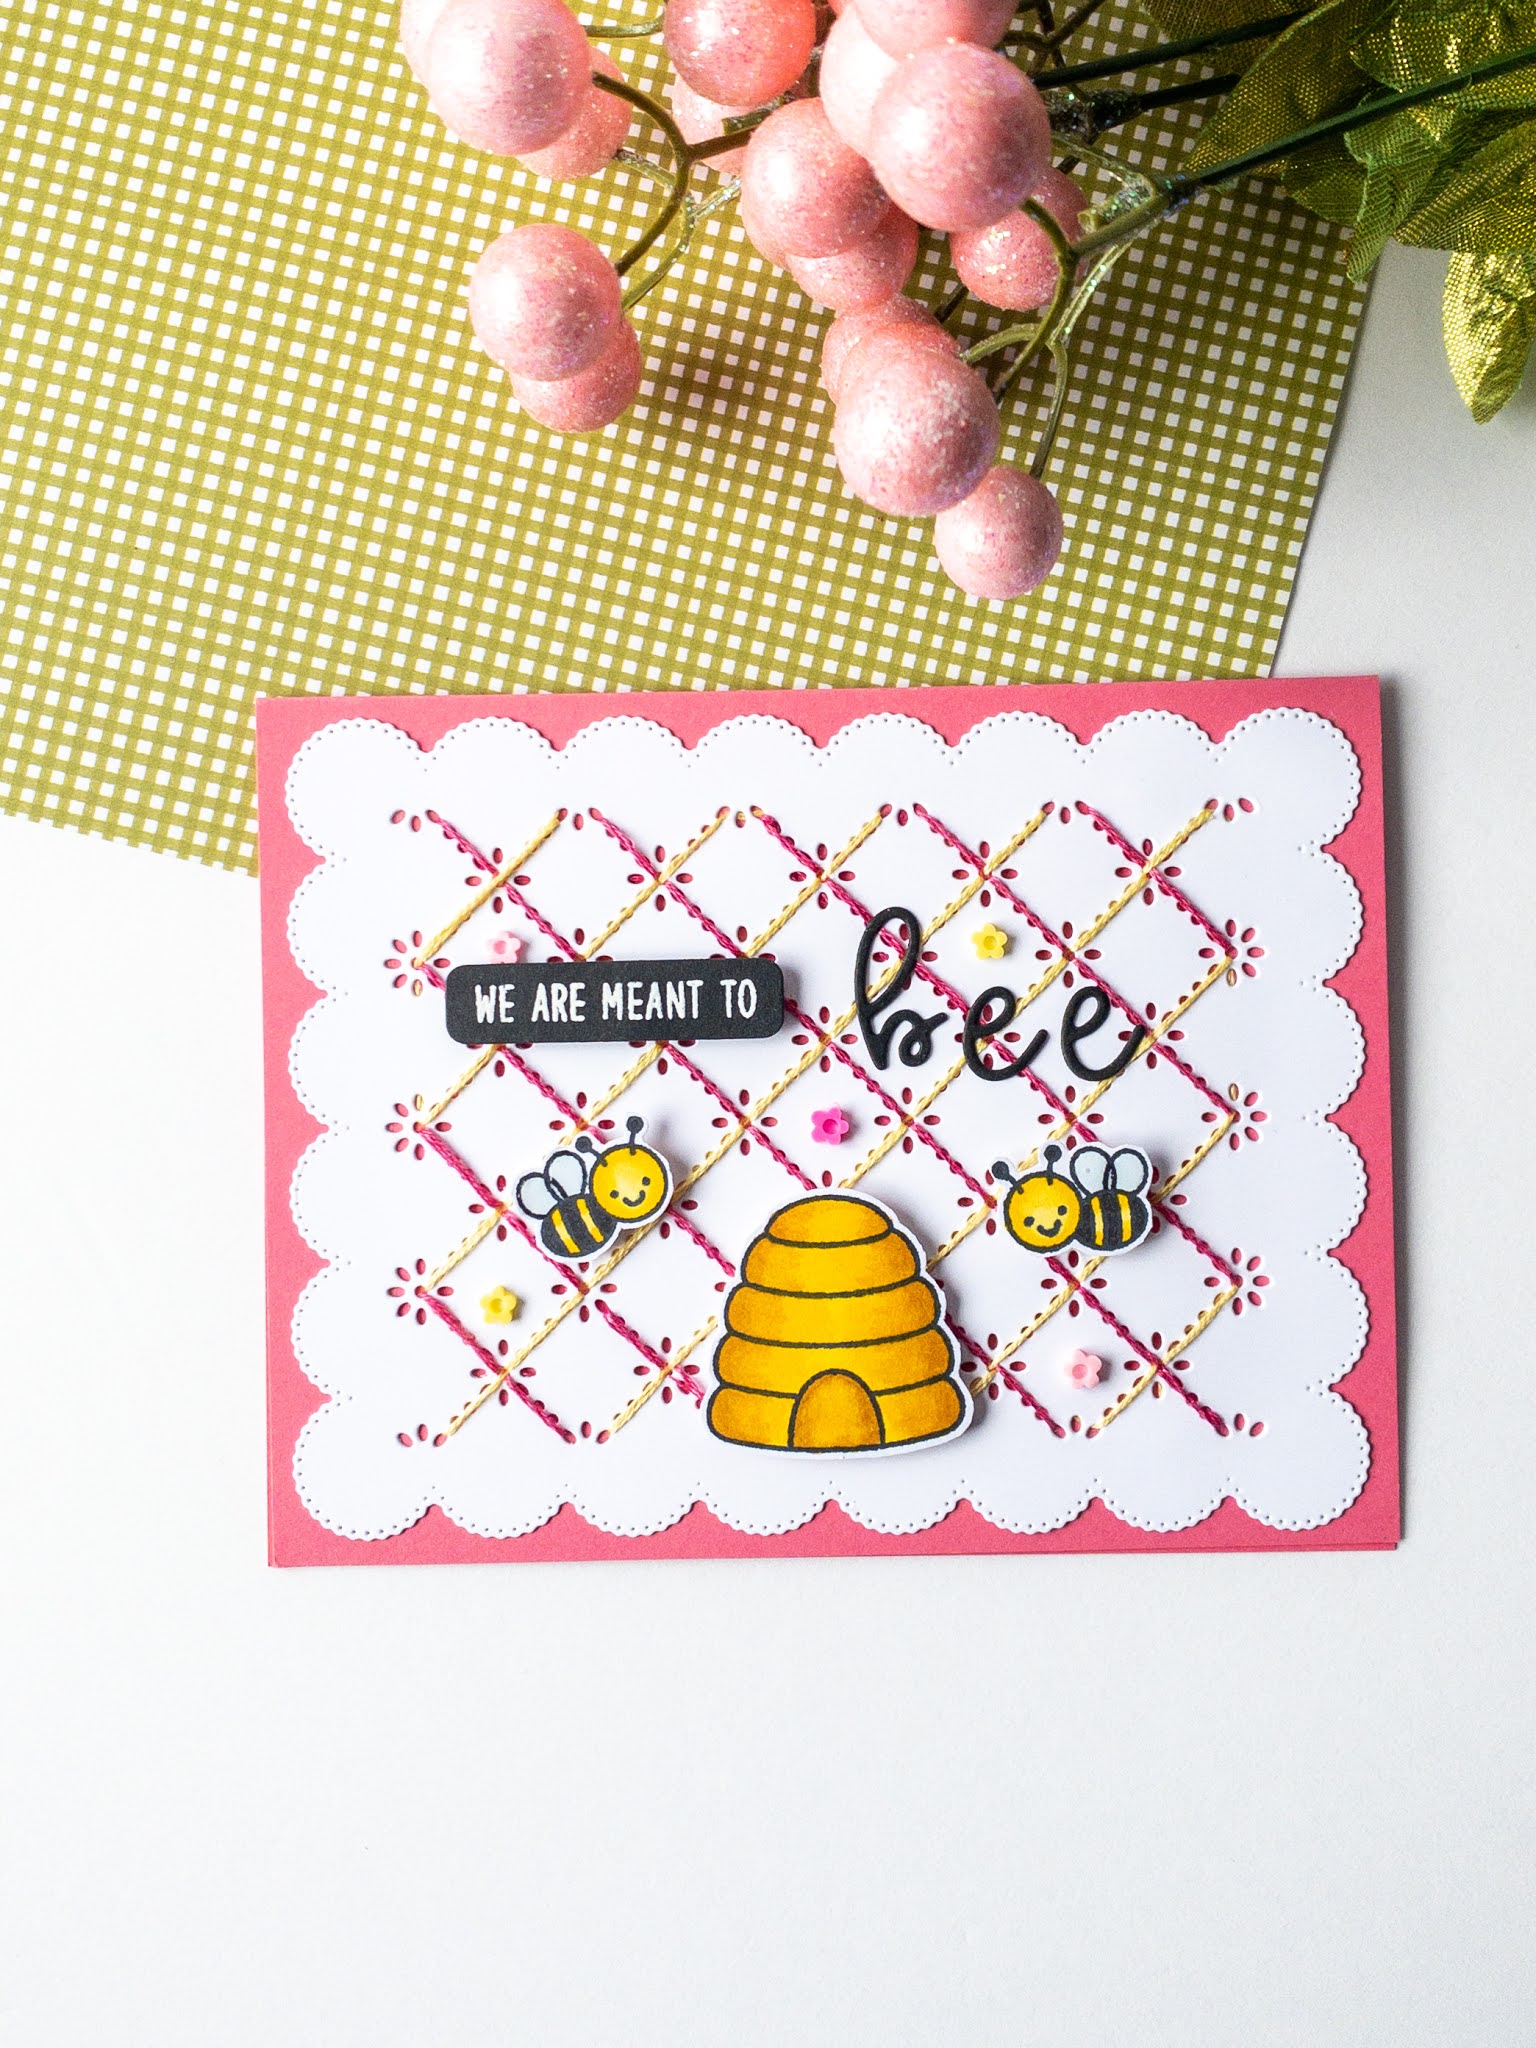
Next up is the Dream Big Stamp Set. 


This set features a sweet little butterfly image.  I started by stamping out the butterfly with a black ink from stash. I then stamped the layers of the butterfly wings with Marigold and Chamomile Ink before cutting it out with the coordinating die.

I also stamped out a few flower images from the Beautiful Day Stamp Set and colored them using colors from the Sunshine Valley Garden Artist Markers Set. I used the coordinating dies to cut out the images.

One of my favorite relaxing things to do is to make easy watercolor panels.  This is exactly what I did for my background panel.  I used some glitter watercolors from my stash.  Once the panel was dry I die cut a circle from the Circular Elements Die Set and also used a stitched rectangle die to add detail.  I adhered the panel to some white cardstock with foam tape and stamped the "Dream Big" sentiment from the stamp set in the center of my circle with some black ink.

I arranged and glued the flowers and butterfly to my card front. The final touch was some clear bobbles from my stash.  The panels were adhered onto a pink card base.

One more card today! I also created a card using the Sweet Flowers Stamp Set. 


I was very excited to play with this set because it has a large floral cluster.  I stamped the outline of the flowers with Almond Butter ink to give softer look.  For the petals I used Sunray and Snapdragon ink and for the stems I used Lime and Frayed Leaf.  I colored in the smaller flower clusters with my alcohol markers as they are just outline stamps.  I used the Orange Cream, Sunkissed, Firebrick, Parrot and Bamboo markers.  The images all have coordinating dies.

I did some more easy watercoloring with the same glittery watercolors (just different colors) to create my background.  Once the panel was dry I die cut the Halftone Cover Die.  I chose to leave most of the little dots in the die because I thought it looked cool!  I did pop out the circles along the edge for more interest.  I cut the panel down to 2 1/2 x 5 1/2 and adhered it to left side of a white cardbase with strong double sided tape.  

My flower images were adhered with foam squares.  I stamped the "You are so Sweet" sentiment with black ink.  I finished the card with some pearl bobbles from my stash.

Thank you so much for stopping by! Have an awesome day!

Jen =)


Thursday, May 13, 2021

Meant to Bee

 Happy Thursday Friends!!

I hope your week was amazing and you're looking forward to a fun weekend ahead.

Today's card features a fun stamp set from Sunny Studio Stamps called "Just Bee-cause".  This set has a cute beehive, 2 little bumblebees and several puny sentiments.


I started my card by die cutting the Frilly Frames Eyelet Lace die from white cardstock.  Jennnifer McGuire gave me the idea to add some stitching to this panel and we all know that you listen when Jennifer McGuire gives ideas LOL.  I added some stitching with pink and yellow DMC embroidery thread.  The thread has 6 strands and I split that in half to be sure I wouldn't rip my cardstock.

I stamped out the two bees and the beehive from the set and colored them in with my alcohol markers.  I fussy cut out the images as I did not have the coordinating dies for the set.

The stitched panel was adhered to a pink cardbase with a strong double sided tape.  I adhered my colored images with foam squares.


The "We are meant to" sentiment was heat embossed in white onto some black cardstock and was die cut from a sentiment die from my stash.  I used the "Loopy Letters" die set to die cut the word "bee" from black carstock two times.  The layers were glued together with liquid glue to add dimension and to make sure the sentiment really stood out from my stitched background.

I finished off my card with some glossy accents on the bee's wings and some "Clay Flower Confetti".

This card is so very sweet and I love how it came out.  I hope you enjoyed!

Thanks again for stopping by!

Jen

Sunday, May 9, 2021

AECP - For the Guys!


Hello friends! Welcome back to my blog! 

Today I am sharing cards from my most recent Altenew Educator Certification Program (AECP) Course.  This was a course called "For the Guys".  Let me tell you that it was a struggle for me because I really missed my flower stamps LOL! Regardless, it is good to know that I now know how to create cards for the males in my life!

Again, this class is open to anyone (not just AECP participants) and you will learn some techniques and card styles that lend themselves well to cards for guys or boys!

My first card features the Altenew Whimsical Herringbone Stamp Set and some watercolor techniques.  I watercolored the heat embossed image on some watercolor paper.  After it was dry I trimmed my panel down and popped it up with some craft foam before adhering it to my cardbase.  Next, I die cut the "Hang in There" die twice from black cardstock and glued them together for dimension.  I heat embossed the top layer with clear embossing powder to give a glossy effect.  I finished off the card by adhering the sentiment and a thin silver frame to my watercolored panel.


My second card was inspired bymy nephew Zayn who is turning two years old very soon.  I started by ink blending the Bubble Wrap Stencil with the Cool Summer Nights Ink family onto some smooth white cardstock.  I die cut the panel before using an alphabet die set to cut out the letters of his name.  I also die cut his name from some green cardstock and several other times from white cardstock.  I wanted this card to have lots of dimension so I stacked and glue the layers together.  The "Z" was made into an interactive springy element with the help of some craft wire.  Because this card is for a two year old I added silly faces to all the letters with gelly pens.  My card was finished off with a heat embossed "Celebrate" Sentiment from the Altenew Celebrate Today Stamp Set.


My last card was inspired by pop culture style.  I started by penciling some guidlines for myself onto white cardstock.  I then stamped the Shades of Friendship Stamp Set in multiple colors (dusk, lime, heartbeat, ocean wave) to form a block focal point.  I used my paper trimmer to cut out the large square image and added some foam to the back before adhering it to a black cardbase.  Next, I die cut the sentiment "Hugs" (from Simple Greetings Die Set) and the shadow from multiple colors of cardstock.  This was a great project for using up some scraps!  I googled "Andy Warhol" to get ideas on color combinations which was very helpful.  I adhered the hugs onto my blocks in a diagonal orientation.  Lastly I heat embossed the sentiment "Sending you warm hugs" from the Heartfelt Sentiments Stamp Set.


These cards definitely challenged my creativity but it is good to push ourselves outside of our comfort zones sometimes!  I look forward to returning to my pretty flowers the very next time I craft LOL!!!

Thanks again for stopping by!

Jen

Back to Top