Wednesday, March 31, 2021

Bunnies Everywhere!

 Hello Friends! Hope you are well and thank you so much for stopping by!

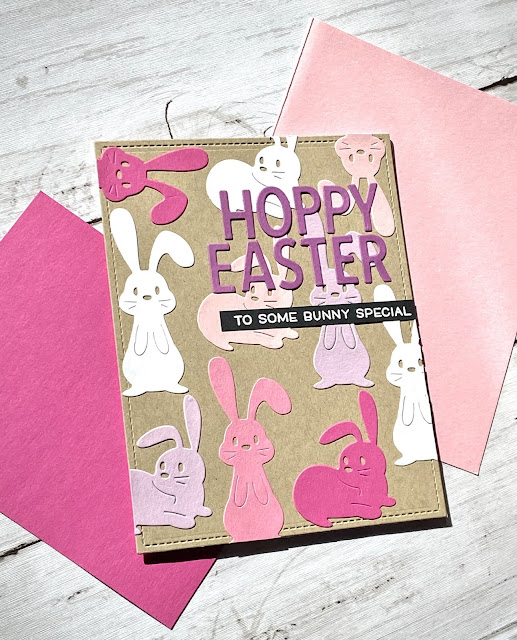
Today we have more of the Spellbinders 24 Carrot bunnies and they are everywhere on my card!  I was inspired by a card by Zsoka Marko (zsoka_marko on Instagram) where she used another Spellbinders die set to cover her card with some cute animals.


This card was a great project for using up some scraps from my stash.  I started by die cutting a bunch of bunnies in different colors of cardstock.  I wasn't really sure what colors I wanted so I chose a variety.

Once all the bunnies were die cut the card came together pretty quickly which was nice for such a cute card.  I die cut a piece of My Favorite Things Craft Cardstock using the Lawn Fawn Large Stitched Rectangle Stackables which made the panel 4 1/4 x 5 1/2.


Next I played around with placement of the bunnies until I was happy and then adhered them down using some liquid glue.  I trimmed any excess that hung over the edge of my panel before adhering it to an A2 side folding card base. 

For my "Hoppy Easter" sentiment I cut out the individual letters from the Concord & 9th Double Cut Alphabet Dies using some purple carstock.  I lined up the letters on my grid mat and picked them up with some washi tape so that I could apply liquid glue to the back.  I used the washi tape to position the sentiments on my card.


Lastly I heat embossed a sub-sentiment using the phrase "To Some Bunny Special" from the Lawn Fawn Eggstra Amazing  Easter Stamp Set.  I used WOW Opaque Bright White embossing powder to emboss the sentiment onto some black cardstock before adhering it onto my card with liquid glue.

That wraps up my card! It's pretty cute right?

You know what they say about bunnies so I may have a few more bunny cards coming ;)

Jen


Tuesday, March 30, 2021

Sunny Studio Stamps Basket of Peonies

 Hello Friends and thank you so much for visiting today!

Today's card features a beautiful basket of pink peonies courtesy of the Sunny Studio Stamps Pink Peonies Stamp Set. I've also used some other goodies from Sunny Studio and I'll break that all down so let's jump into it!


I was really wanted to watercolor some flowers the other day.  I decided to pull out my Zig Clean Color Real Brush Markers and the Sunny Studio Stamps Pink Peonies Stamps.  

I started out by stamping all the images in the set with versamark ink and heat emboss it with WOW Metallic Gold Rich Super Fine embossing powder onto a piece of Strathmore Bristol Smooth Cardstock .  I've had good luck with this cardstock when I am using my Zig markers.


I watercolored the floral images with Light Carmine and Light Pink by applying the markers directly to the paper.  I used a wet paintbrush to smooth out and blend the colors to prevent any harsh lines.  The leaves were colored with Turquoise green and Light Green.  I fussy cut out all the images out once they were dry.


To hold my peony bouquet I stamped and cut out the Sunny Studio Stamps Layered Basket.  I decided to try out stamping the basket on some My Favorite Things Craft Cardstock.  My thought was that it would a good base since it is a brown color! I stamped the layers of the basket in Distress Oxide ink in the colors Antique Linen and Vintage Photo.

Next I needed a lovely background. I wanted a dainty and Spring like background.  I die cut the Sunny Studio Stamps Frilly Frames Eyelet Lace Die from some Hammermill 100lb Cardstock in white.  I love that die! It has an optional scallop border you can use with it that really makes it even prettier!

To add a little pop of color to peek through the dainty flowers I ink blended a 4x5 1/4 panel of Hammermill with Pinkfresh Studio Soft Lilac dye ink. I adhered this panel to the back of the Eyelet Lace panel using Tombow Adhesive Runner Tape.

I wanted to add more Soft Lilac to my card so I created my own custom cardstock by ink blending onto some white cardstock.  I die cut and layered up 2 layers of the word "You" from the Pinkfresh Studios Thin Words Everyday Script die set for my sentiment.  I cut it once from my soft lilac paper and once from white.  Glossy Accents made it shine!

For my sub sentiment I stamped the words "From my heart" onto piece of "custom cardstock" made with Pinkfresh Studio Candy Violet ink.  I trimmed the sentiment down so that it would nestle nicely under my "You" die cut sentiment.

I started assembling my card by adhering my panels onto an A2 side folded card base.  My card base was made from Hammermill 100lb white Cardstock.  Next I glued down my layered basket using some Bearly Arts Prescision Glue.


I grabbed my stamped images and started the grueling task of arranging them.  This is usually the hardest part of using flower images for me.  Finally 2 hours later (just kidding) I was happy with my placement so I used some press n' seal to pick up my images so I could apply glue to the back.  I positioned my florals onto the basket.

My sentiments were adhered to the upper left corner of my card.  The final touch was some Sunny Studio Stamps Iridescent Jewels! 

I love how this card came out! Let me know what you think!

Jen


Monday, March 29, 2021

Spellbinders 24 Carrot Easter Card

Hello friends and thank you so much for stopping by! 

For my first official blog card I chose this cute little card featuring the Spellbinder 24 Carrot set.  This set was the small die of the month for March 2020 and is still (as of when I'm writing this) available on their website.  When I saw this set I knew I wanted to use it to create my Easter cards for this year.


I started by creating the background panel for my card using the Pinkfresh Studio Folk Floral Print stencil.  I envisioned an ombre effect in different shades of purple inks.  I ink blended all the layers of the stencil using distress oxide inks onto a piece of Hammermill 100lb cardstock.  The upper third of the card was blended with milled lavender, the middle third with wilted violet and the bottom third with seedless preserves. I die cut the panel with an Elizabeth Craft Stitched Rounded Rectangle. I love the rounded corners and stitching effect around the panel.


Next it was time to die cut those adorable little bunnies.  I used some light brown cardstock from my stash for the body, black cardstock for the eyes, and pink for the nose and ears. To add some dimension to these cuties I used some copic markers to shade their bodies, cheeks, and ears.  I drew in the mouths with a Sakura black gelly roll pen. Glossy accents helped to make their eyes and nose really stand out a bit more.

The Spellbinders 24 Carrot set also includes the large carrot die cut as well.  I found some orange and green cardstock in my scrap bin and again used some copic markers to add dimension.  Adding even a little bit of shading makes such a difference and really gives die cuts that extra little something!


I knew this was going to be an Easter card so I set out to decide which sentiment I wanted.  I decided on the "Happy Easter" (too obvious?? lol) from the Lawn Fawn Eggstra Amazing Easter stamp set.  I used some versamark ink to stamp and heat emboss the sentiment onto some black cardstock using Wow Opaque Bright White Super Fine embossing powder. I also fussy cut the sentiment out to trim it down a bit.

Time for assembly! I adhered my pretty purple background panel onto an A2 lavender colored top folded note card using Scrappy Tape.  To give a little extra interest I die cut a Pinkfresh Studio Ornate Oval out of white cardstock and adhered it to my card panel with some Bearly Arts Glue.

The carrot and bunnies took center stage at the bottom of the card. After adhering the sentiment to the card with some foam tape I realized I wasn't happy with the placement.  I felt like I should have placed it a bit higher on the card.  To balance things out I decided to die cut a third bunny and I repeated the steps above so that it would match its friends. Then I nestled him (or her ) up above my sentiment as if he was sitting on top of it which I thought was cute and playful!

The last step was a little bit of bling! I added some off brand pearls to frame the sentiment.

I'm really happy with the end result and I'm proud to have it be the first official card on my blog!

Jen


Monday, March 22, 2021

My Very First Blog Post


Welcome!!! 

I’m super excited because this is my FIRST blog post!!! Eeeek!

For my very first post I would like to introduce myself and share a little bit about my crafting journey. Hi, my name is Jen and I’m a wife, mother of two and I live in New Hampshire.

All my life I've been a creative person and enjoyed a variety of crafts. When I was younger I loved making friendship bracelets, creating with clay, and painting with acrylic paint. I would make my Barbies food out of clay and decorate my doll house with my glue gun. My favorite part of our summer family vacations was the trip to Ben Franklins (craft store) because it was like heaven to me lol.

I started scrapbooking after I started dating my husband. I would sit on his bed and make pages while he played video games on his computer lol. A few years later, my coworkers and I were introduced to Stampin’ Up at a party. I was instantly hooked and started buying stamp sets with most of my paycheck money each week.

Over the years I made cards and other craft projects off and on as occasions came up. I get so much joy making handmade gifts for people and it worked out well when I didn't have a ton of money to spend on holidays.

Enter children! As most people know or can imagine having small children doesn't leave much time or energy for anything beyond surviving the days. Also, my craft items and desk were downstairs in the basement (which wasn’t kid proof) so it wasn’t conducive to me creating while the kids played.  My kids are a bit older now and sometimes they will even craft in the room with me.

2020 was a very…..interesting year! In June I decided to make the birthday card for my nephew’s birthday instead of buying one which is what I had been doing for a while. It felt really good to be creative again. Slowly I started accumulating a pile of crafting items on my kitchen table. I started making card after card and watching more and more YouTube tutorials.

My husband eventually bought me a desk (he wanted the kitchen table back) which we put in the living room. I set myself up a cute little crafting corner and that corner is now my happy place! I started sharing my cards on Instagram (@jenmathis_crafts) and now I’m diving into another new adventure with this Blog!

Now that I am crafting again it has brought back so much joy into my life. I hope to share that joy with all of you!
 

Jen

Back to Top